Tuesday, 26 April 2016

Hand Gun Project

Stage 1-Reference
After making a stand for character I moved on to making a gun  using a reference plane in Maya.

Stage 2-Quad Draw
To start off I began to use the quad draw tool to draw out a flat surface which would be the the starting point of my model.

Stage 3-Low Poly Model
From the quad draw and extruded and added edge loops when need to create my low poly model. After receiving feed back about my last gun I used triangles and tried to not use to much edge loops or vertices. 

Stage 4-High Poly Model
After the low poly model I started to develop my high poly model and create a detailed version of the gun in Maya. As I model this I begin to establish which parts would be moveable or should be individual pieces such as the trigger and ammo placement.

Stage 5-Gun Holster
Next I began to model a really simple gun holster as time was against me at this stage so I made something to hint at where the gun would go.

Stage 6-UV Unwrapping
Next I began to UV unwrap my low poly model with the gun holster as I wanted to prevent textures being stretched. This area was quite difficult but I was able to unwrap the UV map within a neat layout.

Stage 7-xNormal
In xNormal I began to bake details from my high poly model to my low poly model. I baked two maps, one was a normal map and the other one was a cavity map. The colour map I made in Photoshop with the use of the UV snapshot. I used Quixel which allowed me to apply high detail materials. This process was replicated from my practice with the cigar model, I was able to also texture the katana sword as well they look really good and will be perfect for my character. I also added the katana sword here so it could share the same textures with the other objects.

Monday, 25 April 2016

Character Stand Project

Stage 1-Modelling
For presentation I decided to make a character stand which draws reference from my concept. I modeled the stand, wall and extra background stuff like bullets. I might add some alphas for the some plants during the texturing

Stage 2-UV Unwrapping
Carrying on with the character stand I started to UV unwrap it which was quite easy. I think my UV unwrapping skills has progressed since the Triple A Asset project.

Stage 3-Texturing
For the texturing of the character stand I used Quixel which allowed me to apply high detail materials. This process was replicated from my practice with the cigar model, I was able to also texture the katana sword as well they look really good and will be perfect for my character. I also added the katana sword here so it could share the same textures with the other objects.

Close Up of the Katana

Thursday, 21 April 2016

Eyeball Project

Stage 1-Sphere
To start off the eyeball model, I used a sphere with 40 by 40 subdivisions and rotated it 90°c on its X axis for making the pupil indent.

Stage 2-Indent
To make the indent I grabbed a few faces of the sphere and pressed D to move the pivot point back a bit so I could scale the faces down making the indented. This left a sharp edge which I had to change so it could be smooth to do that I used the bevel tool.

Stage 3-Pupil
To make the pupil I did a similar thing to the indent, but I started off by grabbing a vertex and pulling it back then I selected the edges and pulled them back as well as scaled. Then to finish it off I added a bevel to add more smoothness to it.

Stage 4-Blinn 1 and 2
Then I moved on to applying materials for texturing later on, I used two blinn materials. One was for the main eye ball the second one was for the pupil, to add the second blinn material to the pupil I had to select the pupil area.

Stage 5-UVs
Next I had to UV unwrap the pupil part of the eyeball so I could use a ramp attribute later on. The UV unwrapping was simple, to achieve this I right clicked on the UV of the pupil and clicked planner map which automatically unwrapped it.

Stage 6-Ramp
For this stage I had to apply a ramp attribute, to do this I clicked the file type in the material editor. I selected the ramp attribute which gives the eyeball a gradient effect. For the pupil I had to apply the circular ramp which makes it into a circle for the gradient colour, I had to add a lot of points to try and replicate an iris colouring scheme.

Stage 7-Eye Shell
The eyeball's shell was another sphere which had the same subdivisions as the eyeball sphere, however this one was a bit larger. I used a blinn texture for this too but dropped its opacity down to zero and put the specular up a 100% to add the shine which makes it look like the gel layer over the eye.

Stage 8-Eye Texture
To add more detail to the eye I took a UV snapshot of the pupil's UV and opened it in Photoshop so I could create the fine details in an iris.

Stage 9-Hypershader
To apply the texture to the model I had to use the Hypershader and attach it to some attributes. I right clicked over the blinn materiel which was assigned to the pupil and clicked on Graph Network. This opened the pupils shaders from here I could add a file format which would be used to add the texture file for the details to be applied on the pupil. I then added a layer texture which would allow the texture to be shown over the colours.

Stage 10-Final Eyeball
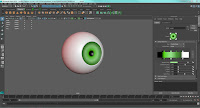
Finally once everything was finished the eyeball is ready to apply to a model. I am happy with this outcome, it is a useful technique to learn in fact if I had more time I would try and make it look more realistic.

Tuesday, 19 April 2016

Katana Sword Project

Stage 1-Reference
I have started to practice my 3D assets skills again, so I chose to make my character's Katana sword. I started off as usual with a reference image which was uploaded on to a plane in Maya.

Stage 2-Low Poly Model
Once I had the image plane sorted I moved on to the modeling of the actual low poly asset. This was a quick and simple process with using the extruding tool on a cylinder and using the vertices to shape the asset. While shaping I followed the image placing to try and get the bend in the asset. 

Stage 3-UV Unwrapping
The next stage after modeling the low poly model was to UV unwrap it, for this I started with an automatic unwrap and then I opened UV Editor. I moved the UVs into groups such as one group for the long part of the Katana, one for the handle and another for the grip. Then I started to cut the UV edges and sew them to the places for the correct unwrapping. However I faced a problem, some of the UVs were curving or bending. To fix that I selected the outer edges and pressed Ctrl and right click to bring up a pop up menu, I moved the cursor to the section called 'To UV' which lead me to another pop up menu but I carried on moving the cursor to the section called 'To UV'. Once 'To UV' was selected all the edges I chose changed to their UVs which meant I could use the align tools to straighten the the curved edges in the UVs. Finally all I had to was lay them out and size them so the checker pattern was even on the asset.

Sunday, 17 April 2016

One Room Game Assignment (Box Art)


 Stage 1-Poster

I designed this poster for an idea that I wanted to try out. I used the polygonal lasso tool to create the shapes, but to fill them I used the gradient tool. I am happy with the outcome and I will use this for the Box Art design.

Stage 2-Draft Box Art
For the Box Art I got the measurements for a pc game case to make the document the right size. Then I placed the image of the poster idea over it for the front cover, but with the eyedropper tool I was able to use the same colour scheme for the back for the spine I kept it the colour black for the white text to stand out. I also used the same techniques for the inventory to make the boxes for the screen shots to go in. Once everything started to come together I then added some small details like the logos of the companies and our team, as well as a barcode, age rating and small print. As a draft it is looking good just need to swap the concept screen shots to actual gameplay screen shots.

Stage 3-Final Box Art
Finally for the final box art I swapped the concept screen shots to the gameplay screen shots, as well as alter some logos. It looks amazing and I am really happy with the outcome.

Friday, 15 April 2016

One Room Game Assignment (Code)

Stage 1-Credits
For a final extra thing I coded a simple end credit scene so that the game ends on a professional note. I learnt this before for my 2D game last year, it was quick and simple to achieve.

Wednesday, 13 April 2016

One Room Game Assignment (2D & 3D Assets)

Stage 1-2D Assets
After working on the menu designs I started to help out by making some 2D and 3D assets. First I designed an Elegant Homing Logo which is the company behind AI as well as some props. I also made a wine bottle and a cigar label for their models and finally I made a quick poem page which is involved with the ten soldier statues.

Stage 2-2D Assets Photos
Then to carry on with the 2D asset I got my friend to model with me for some photos, we dressed similar to the character concepts I did. I also made a love letter for the back of one of the photos.

Stage 3-3D Assets
To help out I modelled some models in May such as a mirror, statue, wine bottle, clothes, varse, taps, light, glass, paper, soap, dish plus a cigar and cigar dish. I modeled these objects to add to the room or fill it with assets. This was a quick and easy stage to complete and once I was happy with the outcome I would need to UV unwrap them so that they could be textured.

Stage 4-3D Assets


Due to issues with Quixel I was only able to texture four of the models the tap, light, cigar and cigar dish, using all the skills I learnt form the 3D Asset Project last term. I am very happy with this model and its textures. However my team mate Alex will have to texture the other models I made.

Stage 5-Palm Leaf Alpha
For this I started to use the techniques to make alphas which I learnt from my character's hair. I started of with a black silhouette of the leaf and then I used a photo of the silhouette place in the same place. I right clicked on it and clicked on clipping mask, after that I made a separate layer which I filled with the abase colour similar to the photo. Once I was happy with these two alphas I then copied the black and white one and inverted it and copied and pasted it in a channel layer to help create the final alpha.
Stage 5-Palm Leaf
Finally I made a plain with a lambert material and uploaded the final alpha to it. Once that was done I opened Hypershade and dragged the  lambert material on to the plain for the final outcome. I am really happy that I was able to replicate the process again and I faced no problems.