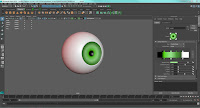
Stage 1-Sphere
To start off the eyeball model, I used a sphere with 40 by 40 subdivisions and rotated it 90°c on its X axis for making the pupil indent.
Stage 2-Indent
To make the indent I grabbed a few faces of the sphere and pressed D to move the pivot point back a bit so I could scale the faces down making the indented. This left a sharp edge which I had to change so it could be smooth to do that I used the bevel tool.
Stage 3-Pupil
To make the pupil I did a similar thing to the indent, but I started off by grabbing a vertex and pulling it back then I selected the edges and pulled them back as well as scaled. Then to finish it off I added a bevel to add more smoothness to it.
Stage 4-Blinn 1 and 2
Then I moved on to applying materials for texturing later on, I used two blinn materials. One was for the main eye ball the second one was for the pupil, to add the second blinn material to the pupil I had to select the pupil area.
Stage 5-UVs
Next I had to UV unwrap the pupil part of the eyeball so I could use a ramp attribute later on. The UV unwrapping was simple, to achieve this I right clicked on the UV of the pupil and clicked planner map which automatically unwrapped it.
Stage 6-Ramp
For this stage I had to apply a ramp attribute, to do this I clicked the file type in the material editor. I selected the ramp attribute which gives the eyeball a gradient effect. For the pupil I had to apply the circular ramp which makes it into a circle for the gradient colour, I had to add a lot of points to try and replicate an iris colouring scheme.
Stage 7-Eye Shell
The eyeball's shell was another sphere which had the same subdivisions as the eyeball sphere, however this one was a bit larger. I used a blinn texture for this too but dropped its opacity down to zero and put the specular up a 100% to add the shine which makes it look like the gel layer over the eye.
Stage 8-Eye Texture
To add more detail to the eye I took a UV snapshot of the pupil's UV and opened it in Photoshop so I could create the fine details in an iris.
Stage 9-Hypershader
To apply the texture to the model I had to use the Hypershader and attach it to some attributes. I right clicked over the blinn materiel which was assigned to the pupil and clicked on Graph Network. This opened the pupils shaders from here I could add a file format which would be used to add the texture file for the details to be applied on the pupil. I then added a layer texture which would allow the texture to be shown over the colours.
Stage 10-Final Eyeball
Finally once everything was finished the eyeball is ready to apply to a model. I am happy with this outcome, it is a useful technique to learn in fact if I had more time I would try and make it look more realistic.


No comments:
Post a Comment