Thursday 11 December 2014

Level Design Assignment

Mood Board
For our first Winter Assignment we had to build and code a level with three triggers that could set off such as sounds, opening and closing doors or turning on and off lights. As with all projects I started off with a mood board to give me an idea of what my game environment could look like. From this I was able to chose a theme and an idea.

One Sheet
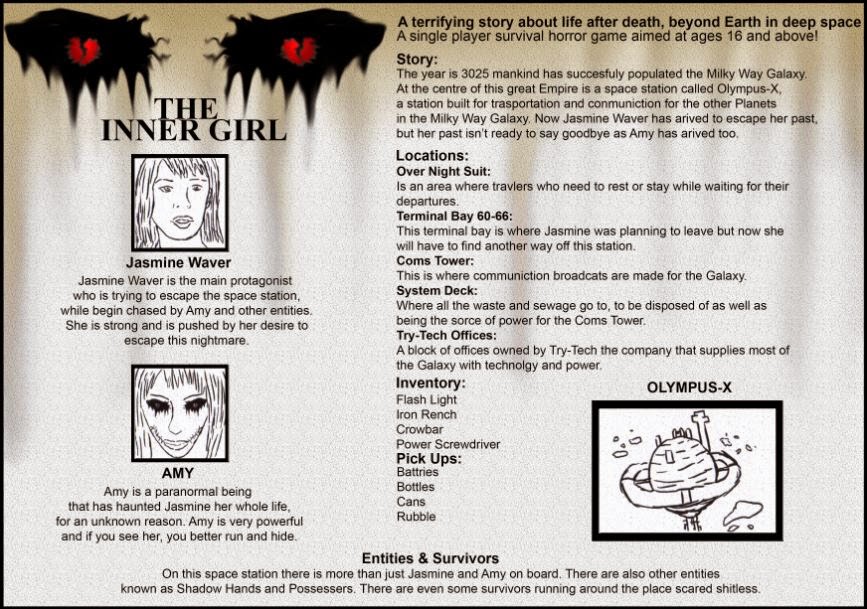
After the mood board I moved on to write up a one sheet of my game, with this one sheet I was able to talk about the story, locations and characters in the game even give details of who it might be aimed at as a target audience.

Level Sketch

Then I began to sketch out my rough level plan with an idea of what might happen in the level. However in this level plan I realised that it was to big and bold for me especially because I am new to scripting, so a lot of features were removed or changed. But later on my level plan completely changed; however it remained true to the one sheet and also some parts of my level sketch remained in the final version.

Story Board

Then I  moved on to the a story board to plan and show what I intend to happen in my level. Like my level sketch a few things changed but the goal was still the same to restore power to the player's location.

Rough Level
Not long after my story board I started to work on a rough level plan made form cubes in Unity, the program I would use to develop a rough idea of what my level would look like.

Level in Maya
After the rough level I started to model my final plan into Maya and then export it into Unity, at first I had a few issues but I over came them and carried on developing my idea further.

Props
I also modeled some props to go in my level, this props could be stuff laying around or game objects for the player to interact with.

Doors Open and Close
Finally I reached the most difficult part of this assignment scripting, first of I started with my doors, which would open side ways for the player to leave or enter the room however I decided that I could only open with a key type object, this would make the level more interactive.


Picking Objects Up
The next script was to allow the player to pick up an object in this case a crowbar. This script was a lot easier than the others mainly because it was short but also quite easy to understand, and I added GUI Text which allows the player to see the word "Crowbar" or "Picked up Crowbar", which I would be useful the player. This crowbar is also used to open doors.

Flash light

The Flash light script was also quite easy and straight forward just like the crowbar. After you code the flash light all you have to do is then parent it with the player's camera so where ever you look the flash light will turn on and off with the button that is coded into the script.
Sound
Finally Sound this was another script I found hard to write and understand but I got the hang of it. I personally think that sound give the level some atmosphere and can even create and sense of  realism.

Back Drop
The last thing I did was add a back drop to my level so when the player looks out the window they see space which is the theme and location of the level. Also the back drop indicates to the player an idea of time.


Level in Unity
Finally after putting my level together I was able to play it as if it was a proper game. This assignment was tough but really interesting and allows us to understand the depth behind games. My level do go through a lot of change but I am happy with the outcome and prefer what I have to what I had planned.

Bed Room
Waiting Hall 
 Power Room
Observational Room


Maya Temple Assignment

Reference Image

Starting Point
For our Winter Maya Assignment we have to model a temple using a reference image as shown above. First I started with the columns, pillars and sides for the basic shapes then, I started to work on the walls using a Cube; however for the roof I used a Pyramid shape.

Model in Maya
After that I started to place the parts together allowing one half to be done, but for the second half I mirrored the model to get the whole temple base.

Materials
Roof Texture
Wall Texture 


Textured Model
Then I started to place textures using the textures above allowing me to give the temple more of a real touch to it all this was a perfect opportunity to practice my knowledge of UV mapping and texturing which I had struggled with in the past.

Final Details
Finally after adding the textures to the temple I moved on to add details that were in the reference image.

Final Outcome
Then finally I completed my attempted at the temple model, I personally think it went well and I have improved texturing in Maya. The over all model was fun to build and was a perfect chance to practice the skills we have learnt in Maya so far.

Saturday 6 December 2014

Skeleton Anatomy Assignment

Step 1-Mood Board
For our assignment we had to show we understand the human body, more specific the skeleton's bones and joints. As with a lot of the set work I start off with a mood board of skeletons, bones and a few joints.

Step 2-Sketches
After I researched I then began to practice drawing skeletons and certain  bones. To prepare me for my final sketch which I would draw on the computer to get use to drawing on the computer which is a key skill I will need to get use to.

Step 3-Final Sketch
 Here is my final sketch done in Photoshop, which shows the front, back and side view of a human skeleton.

Step 4-Bones
Now I began to use my final sketch to show where different types of the bones are on the body.

Step 5-Joints
Finally I did a similar diagram to the bones one, but this time for the joints on the body.